

What To Use To Repair Chimney Cracks
How to Maintain and Repair Your Chimney
Make your chimney terminal for decades with a few hours of unproblematic maintenance
![]() Time
Time
A few hours
![]() Complexity
Complexity
Intermediate
Introduction
Cracks and spalling in a brick chimney can become worse fast, but the fix is easy if y'all practise it in time. Two pros share maintenance tips that will keep your chimney solid for the life of the firm.
Tools Required
Materials Required
- Brushable crown sealer
- Chimney cap
- Disposable gloves
- Duct tape
- Water repellent
Chimney basics
Chimney inspection
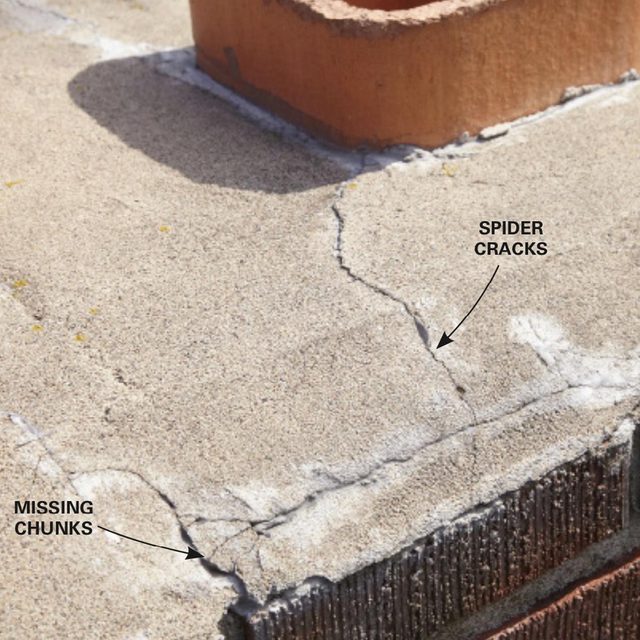
The cracks in this chimney crown have reached a critical betoken. If not sealed soon, they'll destroy the crown and eventually the chimney.
Most homeowners never think about masonry chimney maintenance across the occasional flue cleaning. Simply ignoring your chimney tin can cost you big-time. A cracked chimney crown or spalling bricks can easily price $1,000 to repair. And, if left untreated, the harm tin can advance quickly, and cost you up of $3,000.
It doesn't have to be that way. By simply sealing the bricks and the crown and adding a chimney cap, you'll greatly extend your chimney'due south life. The materials price less than $300, and you can complete all 3 procedures in simply a few hours. Yous'd pay a pro near $1,000 to do all three, and then the savings is huge.
You'll have to climb up on your roof twice (one time to measure the flue liner to order the correct chimney cap and once to perform the procedures). And, you must be able to safely reach the chimney crown from your roof. If you tin can't reach the chimney crown, take a very steep roof pitch or aren't comfortable working on your roof, telephone call a pro. If yous decide you can handle the heights, brand sure y'all wear a rubber harness.
Meet the Pros

Jim Smart has owned Smart Sweep Chimney Service for 14 years. He and his son, Jesse, are certified professional chimney sweeps. Together, this male parent/son team inspects, cleans and repairs chimneys in the Minneapolis-St. Paul expanse. In addition to his chimney sweep certifications, Jim holds a certificate in forensic chimney fire analysis. In other words, Jim understands how chimneys piece of work and fail. He'due south a pro's pro.
Project Details
Brushable crown sealer, $60
Chimney water repellent, $35
Garden pump sprayer, $35
Stainless steel chimney cap, $125
Tarps, duct tape, paintbrush
Project stride-by-pace (4)
Step one
Start at the chimney crown
Apply the first coat of chimney sealer by hand
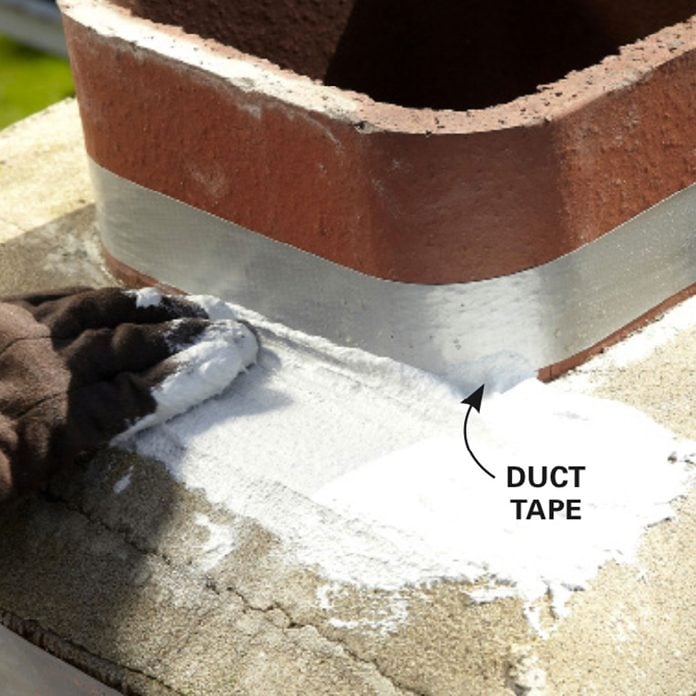
Scoop upwards a handful of the sealer and wipe it onto the crown. Force the sealant into the cracks and into the crown-to-brick seam.
Stride 2
Even out the chimney sealer
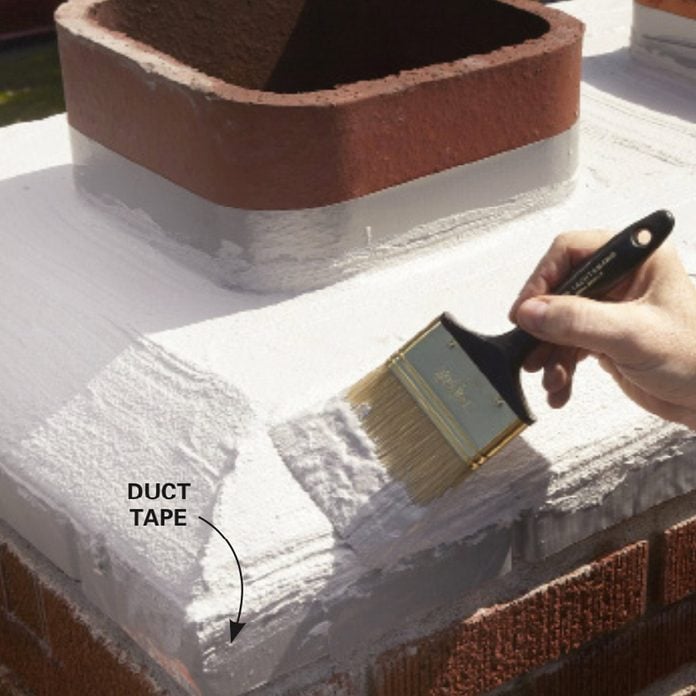
Stroke the wet sealant with a brush to level the high and low spots and create a shine surface.
Masonry chimneys are capped with a mortar 'crown' to foreclose h2o from getting behind the bricks and alongside the flue, and into the house. Over time, normal expansion and contraction cycles tin cause cracks to form, every bit shown above. Sealing the chimney crown with crown sealer, a flexible elastomeric coating, is the all-time manner to stop existing cracks from spreading and prevent new ones.
Choose a clear or overcast twenty-four hour period for the project (no pelting in the forecast for at least four hours). Prepare the crown by cleaning information technology with a potent poly or nylon brush. Fill up whatsoever big cracks with patching cement or 100 percentage silicone caulk (they'll cure even subsequently you apply the crown sealer).
Next, wrap duct tape all around the crown about 1/four in. below the edge of the crown-to-brick seam. Press the tape into the vertical brick joints. Then tape around each flue liner i in. above the crown. Lay canvas (non plastic) tarps around the base of operations of the chimney to protect the shingles from crown sealer drips.
Our chimney repair skilful applies crown sealer by paw so he can force it into cracks and get the first coat done faster. If you choose that method, just sideslip on a disposable glove and apply the sealer (Photograph one). (I brand is Chimney RX Brushable Crown Repair; sold by the gallon at saversystems.com) Cover the entire crown and then smooth it with a paintbrush (Photo 2). Wait until the sealer dries tacky to the touch, then apply a second coat with a brush. Clean up with water.
![]()
Stride 3
Seal the chimney bricks
Spray the brick with h2o repellent
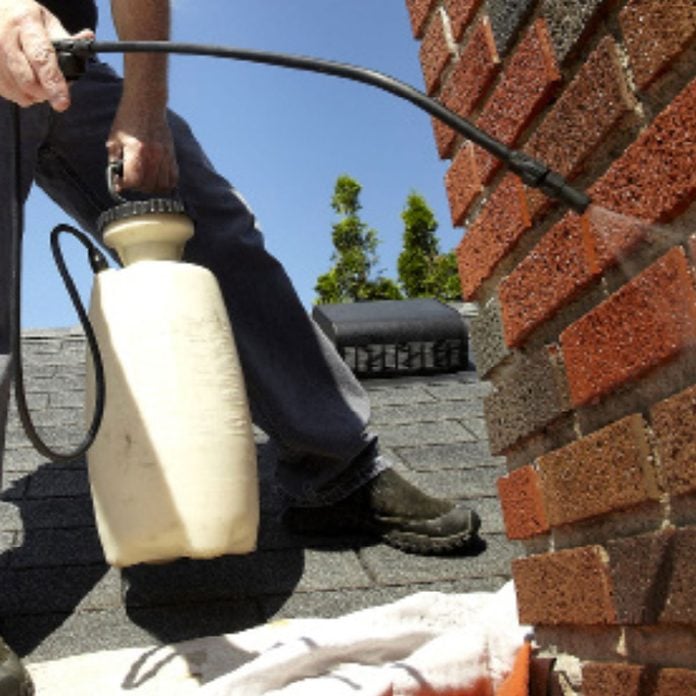
Start at the bottom of the chimney and spray the brick until the excess repellent runs downward almost viii in. below the spray line. Piece of work your way up to the top. Apply a second coat within five minutes using the same technique.
Once the crown sealer feels dry to the touch on (thirty to threescore minutes), remove the duct tape just go out the roof tarps in place. Then mask off any painted chimney flashings before applying the water repellent. Spray on the repellent (one brand is Chimney RX Masonry Chimney Water Repellent; sold at saversystems.com) with a depression-pressure, garden pump sprayer (Photo 3).
Step iv
Finish it off with a chimney cap
Install the cap
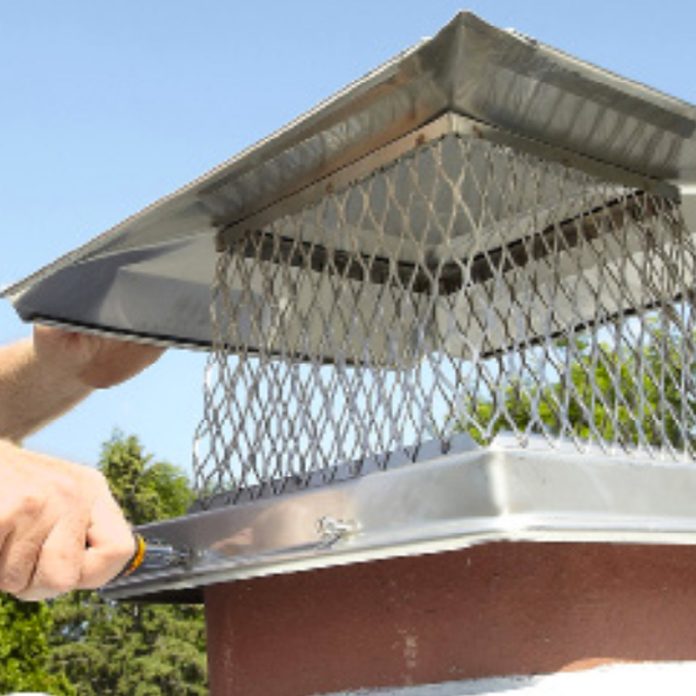
You don't want animals getting into your chimney. Set the cap (run across chimney cap cost above) over the flue liner and secure information technology with screws. Tighten until snug, just no more. Excessive pressure can fissure the clay liner.
A chimney cap keeps water and critters out of your flue and extends flue life. Many codes crave a mesh cap, so cheque before buying. Chimney expert Jim Smart recommends spending extra to get a stainless steel cap considering it volition last much longer than the galvanized type. One source for stainless steel caps is efireplacestore.com
Y'all'll need the outside dimensions of the flue liner to get the right size cap for your chimney. And then install it on the flue liner (Photo 4).
Originally Published: Feb 28, 2022

What To Use To Repair Chimney Cracks,
Source: https://www.familyhandyman.com/project/chimney-maintenance/
Posted by: cochrantaidow.blogspot.com
0 Response to "What To Use To Repair Chimney Cracks"
Post a Comment